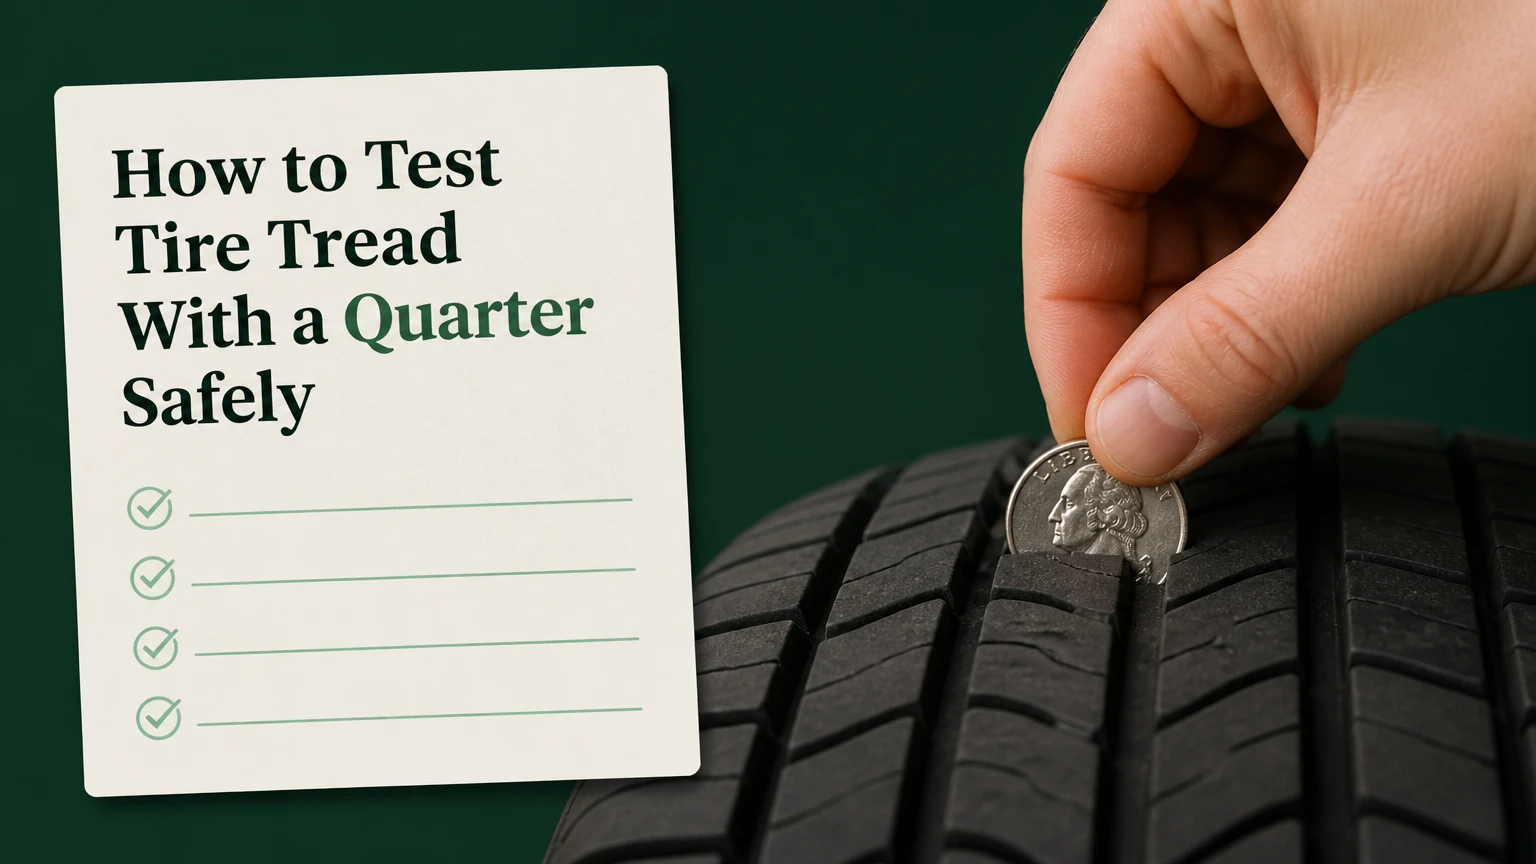
To test tire tread with a quarter, place a US quarter upside down in a main tread groove with George Washington’s head pointing toward the tire. If the tread reaches into Washington’s hair or covers part of his head, the groove is deeper than approximately 4/32 inch, or 3.2 mm. If his head is completely visible, measure with a gauge and plan tire replacement, especially before rain or snow.
Key Facts at a Glance
- The quarter test estimates whether tire tread is above or at approximately 4/32 inch, or 3.2 mm.
- Washington’s head must point downward into a main groove for the visual comparison to work.
- Check at least four positions across each tire because shoulder and center wear can differ.
- The legal minimum is commonly 2/32 inch, or 1.6 mm, but local regulations vary.
- A quarter cannot detect low inflation, sidewall damage, age cracking, internal damage, or alignment faults.
- A tread-depth gauge gives a more precise measurement and typically costs about $5-$15.
Before You Start
A full quarter inspection normally takes 5-10 minutes and costs nothing if you already have a US quarter. The task is easy, but accurate results depend on using a clean, undamaged coin, reaching the deepest molded grooves, and inspecting more than one point on every tire.
| Requirement | Typical value | Practical instruction |
|---|---|---|
| Time for four tires | 5-10 minutes | Allow extra time for debris removal |
| Cost with a quarter | $0 | Use a readable US quarter |
| Optional gauge cost | $5-$15 | Choose a mechanical or digital 1/32-inch gauge |
| Measurement points | 4-6 per tire | Check both shoulders and the center |
| Vehicle condition | Parked and stationary | Use level ground and the parking brake |
| Best lighting | Daylight or bright lamp | Avoid judging a shadowed groove |
Gather a US quarter, flashlight, gloves, and a small plastic pick if grooves contain stones. Do not place any part of your body under the vehicle, and do not rely on the quarter test while the vehicle is moving or supported only by a jack.
Check tire pressure separately with a pressure gauge. The quarter test measures tread depth, not inflation pressure. The National Highway Traffic Safety Administration recommends inspecting tires and checking inflation regularly; tread depth alone cannot establish that a tire is roadworthy.
What Does the Quarter Test Actually Tell You?
The quarter test is a screening method for approximately 4/32 inch of remaining tread, a level associated with reduced wet-weather reserve. The US quarter’s rim-to-head distance provides the visual reference, so the test gives a threshold result rather than an exact depth reading.
A tire can still grip adequately on a dry road when the quarter test shows Washington’s head, but reduced groove depth leaves less room to channel water. Hydroplaning resistance and wet braking depend on tread design, tire compound, speed, water depth, temperature, inflation, and vehicle condition, so 4/32 inch is a replacement-planning benchmark rather than a universal guarantee of safety.
Tread-depth reference points
| Remaining tread | Millimeters | Meaning for a passenger tire |
|---|---|---|
| New all-season tire | 8-10 mm typical | Full designed groove depth |
| New winter tire | 9-12 mm typical | Deeper grooves for snow evacuation |
| Quarter threshold | 4/32 inch, 3.2 mm | Begin replacement planning |
| Penny threshold | 2/32 inch, 1.6 mm | Common legal minimum in the US |
| Wear bar level | 2/32 inch, 1.6 mm | Tread is flush with molded indicator |
New-tire depth varies by model, size, category, and manufacturer. Performance tires may begin with less tread than many touring tires, while winter tires often use deeper grooves and specialized sipe patterns.
How to Test Tire Tread With a Quarter
Use the following five-step process on all four road tires. The most important accuracy rule is to insert the quarter vertically into a molded main groove, not into a shallow lateral channel or a damaged section of rubber.
Step 1: Park and expose the tread
Park on level pavement, select Park or first gear, apply the parking brake, and switch off the vehicle. Turn the steering wheel left or right to expose the front tire’s inner tread, but do not crawl under the vehicle or touch a tire that is hot from extended driving.
For the rear tires, walk around the vehicle and inspect from outside. If access is poor, a repair shop can measure the inner shoulder safely on a lift.
You’ll know this step worked when: the vehicle cannot roll and you can see the full tread width without placing yourself in a dangerous position.
Common mistake: checking only the exposed outer shoulder while assuming the inner shoulder matches it.
Step 2: Clear the main grooves
Remove stones, mud, and loose debris from the grooves you intend to test. Use your fingers while wearing gloves or a blunt plastic tool; never use a screwdriver, knife, or metal pick that could cut the rubber or damage a tire puncture.
Do not confuse a trapped stone with a tread-wear indicator. Wear bars are raised rubber bridges molded across the longitudinal grooves, and they appear at multiple positions around the circumference.
You’ll know this step worked when: the quarter can descend straight into the groove until the tread blocks contact the coin’s rim.
Common mistake: measuring a stone or dirt ridge instead of the bottom of the groove.
Step 3: Insert the quarter correctly
Hold the quarter with Washington’s head upside down, meaning the top of his head points toward the groove’s bottom. Lower the coin straight down between the tread blocks so the coin face is approximately perpendicular to the tread surface.
Use a reasonably readable quarter. Circulation wear generally does not change the reference enough to make an ordinary coin useless, but a severely damaged, bent, or heavily worn coin can make the visual boundary harder to judge.
You’ll know this step worked when: the coin stands vertically, the rim contacts the tread blocks, and the coin is not leaning against one side of the groove.
Common mistake: placing Washington upright, which reverses the intended reference and produces a misleading result.
Step 4: Read the Washington result
Look straight across the tread surface at eye level. If the tread covers any part of Washington’s head or reaches his hairline, the location measures above approximately 4/32 inch. If the entire head is visible above the tread, that location is at or below the quarter-test threshold.
Do not interpret a partial result from an angled view. A coin tilted toward you can make the tread appear deeper, while a coin tilted away can make it appear shallower.
You’ll know this step worked when: the same result remains visible after you reposition your eyes directly level with the tread.
Common mistake: calling the tire “good” because the head is covered at one point, even though another point fails.
Step 5: Repeat across every tire
Check at least four locations on each tire: the outer shoulder, center-left or center rib, center-right or adjacent groove, and inner shoulder. Rotate the tire by moving the vehicle a short distance only after securing the vehicle again, or inspect accessible sections around the circumference.
Record the lowest result for each tire. A tire that passes on the center rib but fails on an inner shoulder needs more investigation, not an average score.
You’ll know this step worked when: you have a lowest tread result for each of the four tires and can compare left-right and front-rear patterns.
Common mistake: testing one front tire and applying that result to the whole vehicle.
How Should You Interpret Different Results?
Treat the quarter test as a traffic-light decision: above 4/32 inch permits continued monitoring, at or below 4/32 inch calls for replacement planning, and wear bars or a failed penny test require immediate professional attention. The correct response also depends on damage, weather, mileage, and uneven wear.
| Quarter result | Additional observation | Recommended action |
|---|---|---|
| Hair or part of head covered | Even tread and no damage | Monitor monthly and before long trips |
| Head fully visible at one spot | Other spots pass | Measure with a gauge and investigate uneven wear |
| Head fully visible across tire | Rain or snow expected | Arrange replacement before severe weather |
| Wear bars flush with tread | Any location around tire | Replace promptly; check local legal requirements |
| Tread appears deep | Bulge, crack, exposed cord, puncture | Stop driving if unsafe and seek tire service |
The 4/32-inch point is not the same as the legal limit everywhere. In many US jurisdictions, 2/32 inch is the regulatory or inspection threshold, but state, provincial, and national rules differ. A tire can be legal and still provide a smaller wet-weather safety margin than a newer tire.
When Should You Replace the Tire?
Replace or professionally evaluate a tire when the quarter test shows 4/32 inch or less, particularly before frequent rain, snow, high-speed highway travel, towing, or a long road trip. Replace immediately when tread-wear indicators are flush, cords are visible, the casing has a bulge, or the tire has serious cuts or sidewall cracking.
Tire manufacturers may set additional recommendations based on tire age and condition. NHTSA advises consumers to follow the tire maker’s guidance and inspect tires for damage; the date code on the sidewall identifies the week and year of manufacture, but age policy varies by manufacturer.
A practical replacement timetable looks like this:
| Driving situation | Quarter-test response | Planning window |
|---|---|---|
| Dry urban commuting | Monitor if above 4/32 inch | Recheck monthly |
| Frequent heavy rain | Replace at or near 4/32 inch | Before the next wet season |
| Snow and ice region | Do not wait below 4/32 inch | Replace before winter |
| Highway or towing use | Use a gauge at every inspection | Replace before long travel |
| Tire at 2/32 inch | Treat as worn out | Replace immediately |
| Visible structural damage | Do not rely on tread result | Professional inspection now |
Winter traction deserves special attention. A winter tire with 4/32 inch remaining may still pass a quarter check, but its snow performance is materially lower than when new; many tire professionals recommend replacing winter tires around that depth because snow evacuation and block-edge effectiveness decline.
What Do Uneven Tread Patterns Mean?
Uneven tread depth usually indicates a maintenance, alignment, suspension, or rotation problem rather than normal tire aging. Compare readings from the inner shoulder, center, and outer shoulder, then match the pattern to the likely cause before buying replacement tires.
| Wear pattern | Likely cause | Next diagnostic action |
|---|---|---|
| Both shoulders shallow | Chronic underinflation | Check cold pressure against door-jamb specification |
| Center rib shallow | Chronic overinflation | Verify gauge accuracy and pressure setting |
| Inner shoulder shallow | Excessive negative camber or toe | Request alignment and suspension inspection |
| Outer shoulder shallow | Cornering load or alignment error | Check alignment, steering, and tire pressure |
| Cups or scallops | Worn shock or strut, imbalance | Inspect suspension and wheel balance |
| One isolated bald patch | Locked-wheel braking or damage | Have the tire and braking system inspected |
| Diagonal or feathered ribs | Incorrect toe setting | Get a four-wheel alignment |
A tire can pass the quarter test at the center while failing dangerously on the inside edge. This is one reason a quick outer-edge inspection is inadequate, especially on vehicles with independent suspension or aggressive alignment settings.
What if the inner and outer readings disagree?
Use the lowest measurement as the decision value and arrange an inspection. For example, if the outer shoulder covers Washington’s head but the inner shoulder shows the entire head, the tire has crossed the 4/32-inch threshold at the inner edge even though most of the visible tread looks deeper.
Do not “fix” shoulder wear by increasing or decreasing pressure outside the vehicle manufacturer’s specification. Incorrect pressure may worsen wear and reduce handling stability.
Is a Quarter Better Than a Penny or Gauge?
A quarter is better for identifying the 4/32-inch wet-weather planning threshold, while a penny identifies the approximately 2/32-inch minimum and a tread-depth gauge provides the most precise measurement. Drivers who need a single exact number should use a gauge after the coin screen.
| Method | Reference depth | Typical cost | Best use | Main limitation |
|---|---|---|---|---|
| US quarter | 4/32 inch, 3.2 mm | $0.25 face value | Rain and winter planning | Approximate visual result |
| US penny | 2/32 inch, 1.6 mm | $0.01 face value | Finding severely worn tread | Warning arrives late |
| Mechanical gauge | 1/32-inch increments | $5-$10 | Home maintenance | Requires correct placement |
| Digital gauge | Often 0.01 mm display | $10-$25 | Detailed comparison | Battery and calibration dependence |
| Shop gauge | 1/32 inch or millimeter | Often free with service | Confirmation and records | Requires access to a shop |
The penny test is not a replacement for the quarter test. Waiting until Lincoln’s entire head is visible means the tread has reached a commonly recognized minimum, leaving less reserve for standing water and poor weather.
How do you use a tread-depth gauge?
Press the gauge’s base flat against the tread blocks, place the probe at the bottom of a main groove, and avoid the raised wear bar. Take readings across each shoulder and center area, then record the lowest value in 32nds of an inch or millimeters.
A gauge is especially useful when Washington’s head is only partly covered, when readings vary by 1/32 inch, or when a tire is being evaluated for a long trip. A $5 tool can distinguish 5/32 inch from 4/32 inch more reliably than eyesight.
What the Quarter Test Cannot Detect
The quarter test cannot assess tire pressure, age-related rubber hardening, sidewall injury, puncture repair quality, wheel alignment, suspension wear, vibration, or the remaining life of the tread compound. A tire that passes the coin test can still be unsafe.
Inspect the sidewalls for bulges, cuts, cracking, exposed cords, and objects embedded near the shoulder. Check the DOT identification code for manufacturing age, confirm the tire size and load rating, and look for a TPMS warning light or repeated pressure loss.
The quarter also cannot evaluate tread depth on the spare unless the spare has a suitable groove. Compact temporary spares often use different construction, speed limits, inflation pressure, and replacement rules. Follow the spare’s sidewall instructions and the vehicle owner’s manual.
Common Mistakes and How to Fix Them
- Testing only the outer shoulder: Check the inner shoulder with the wheel turned or have a shop lift the vehicle.
- Using a lateral groove: Move to a deep longitudinal groove between the main tread ribs.
- Holding the coin at an angle: Insert it vertically and view the tread at eye level.
- Treating one passing spot as proof: Record the lowest result from at least four points per tire.
- Confusing wear bars with tread: Compare the raised bars across several grooves; flush bars indicate approximately 2/32 inch.
- Ignoring pressure and damage: Pair the quarter test with a cold-pressure check and sidewall inspection.
- Driving after a structural warning: A bulge, exposed cord, or sudden pressure loss requires tire service rather than another coin test.
One practitioner rule prevents many errors: when two readings conflict, believe the lower reading until a gauge or technician proves otherwise. The lowest groove controls the tire’s practical reserve.
How Often Should You Check Tire Tread?
Check tread monthly, before a long trip, before seasonal weather changes, and whenever the vehicle develops pulling, vibration, noise, or pressure loss. A monthly inspection pairs well with checking cold inflation pressure because pressure problems often create the uneven wear that a quarter test reveals.
Use a gauge every 3,000-5,000 miles if you want a written wear trend, or at every tire rotation. Commercial vehicles, performance vehicles, vehicles carrying heavy loads, and cars driven on rough roads benefit from more frequent checks.
How much does a professional inspection cost?
Many tire retailers provide a no-cost tread and pressure inspection, while a standalone alignment check commonly costs about $80-$150 in the United States, depending on location and vehicle. A new set of passenger tires commonly costs approximately $400-$1,200 before installation, with size, brand, vehicle type, and tire category creating major variation.
| Service or item | Typical price range | Typical time |
|---|---|---|
| US quarter or penny | $0.25 or $0.01 | Immediate |
| Mechanical tread gauge | $5-$10 | 1 minute per tire |
| Digital tread gauge | $10-$25 | 1 minute per tire |
| Tire inspection at retailer | $0-$30 | 10-20 minutes |
| Four-wheel alignment | $80-$150 | 1-2 hours |
| Passenger tire installation | $400-$1,200 per set | 1-3 hours |
Prices vary by region and vehicle. Ask whether mounting, balancing, valve service, disposal fees, taxes, and alignment are included in a tire quote.
Situational Guidance for Rain, Snow, and Travel
Drivers facing heavy rain or snow should use the quarter test as an early replacement screen, not as permission to continue until the penny threshold. Highway speeds, standing water, cold temperatures, worn shocks, and incorrect pressure can reduce grip even when the quarter result is marginally above 4/32 inch.
Before a road trip, check every tire when cold, inspect the spare, verify the door-jamb pressure specification, and look for nails or sidewall damage. Rotate the vehicle only after securing it; never place hands near a moving tire.
Performance drivers should skip coin-only decisions when setup precision matters. A gauge allows 1/32-inch comparisons across tires and can reveal whether one shoulder is losing tread faster than the others.
FAQ
Can I use a nickel instead of a quarter?
A nickel is not a standardized substitute for the quarter test because its design and relevant coin dimensions do not represent the same 4/32-inch reference. Use a US quarter for a threshold screen or a tread-depth gauge for an exact reading.
Does the quarter test work on motorcycle tires?
The quarter test can provide a rough visual indication on motorcycle tires with suitable grooves, but motorcycle tires require additional inspection of profile, sidewall condition, age, and manufacturer wear indicators. Follow the motorcycle tire maker’s replacement criteria rather than relying on the coin alone.
Can a tire pass the quarter test but fail inspection?
Yes. A tire can have more than 4/32 inch of tread and still fail because of a bulge, exposed cord, severe cracking, puncture damage, improper size, or an unsafe wear pattern. Tread depth is one inspection variable, not a complete safety certification.
Should I replace one tire or all four?
Replacement quantity depends on tread difference, drivetrain, tire manufacturer guidance, and vehicle requirements. Replacing one tire on an AWD vehicle can create unacceptable circumference differences, while some vehicles require matching tires on the same axle. Ask a tire professional to measure all tires before ordering.
How do I know whether my quarter result is exactly 4/32 inch?
The quarter test cannot establish an exact measurement because visual alignment, coin condition, groove shape, and observer angle affect the result. Use a calibrated tread-depth gauge, measure in several grooves, and record the lowest reading in 32nds or millimeters.
Is 4/32 inch legally bald?
No, 4/32 inch is generally an early replacement-planning threshold, not the legal bald-tire limit. Many US jurisdictions use 2/32 inch as a minimum, but laws differ by location, and a tire may be legal while offering reduced wet-weather performance.
The Bottom Line
The quarter test is a fast, free way to screen tire tread at approximately 4/32 inch, the point where wet-weather and winter reserve deserve serious attention. Insert Washington’s head upside down, check four or more positions across all four tires, and use the lowest result. If the head is fully visible, confirm the depth with a gauge and arrange replacement planning. The quarter test answers one question, but a safe tire inspection also includes pressure, wear pattern, age, damage, and alignment.